How To Set Up SMTP Server With Postal (Step By Step Guide)
In this Step by Step Guide, we will show you how to set up a SMTP server using Postal, the open-source SMTP software to Send Unlimited Emails.
There are several methods to build SMTP servers, in this guide we will build the SMTP server using a free open source software called “Postal“.
Postal is a fully-featured open-source mail delivery platform for incoming & outgoing e-mail and gives you all the tools and features needed to build a full mailing system for your business.
What is the SMTP Server?
We have described it in detail about this in our another blog “What is a SMTP Server?“. But if you want know it in brief, here it is:
SMTP is that thing that allows you to send emails over the internet.
SMTP stands for “Simple Mail Transfer Protocol”. It's a Concept in Networking that you don't have to worry about.
Just Know that SMTP is the technical thing that is responsible for delivering emails over the internet.
What do we mean by Sending Unlimited Emails?
When we say unlimited emails, this means that we can send unlimited emails from our server, there are no restrictions by companies or monthly plans to buy or so.
It's your server, you can send as much as your server can handle in terms of resources. So when you have more CPU and RAM, you can send more emails and so on.
Let's Start The SMTP Server Setup
Ok, let's start the real work! But, before we start, you need to know what is required.
Requirements to Setup SMTP Server.
In order to Build and Setup an SMTP Server, you will mainly need two things:
- A Domain Name
- VPS Server with Port 25 Opened.
1. Domain name
When you send emails, you will be sending from an email address like this one:
[email protected]
So in our case, “sapnaaz.com” is the domain name that we use to send our emails. It's required to have a domain name to use when you send emails from your SMTP server.
Usually, it's your website domain name, except if you are working with cold emails, then it's better to get and use another domain in case it got blacklisted, to keep your main business domain safe.
So if you don't have a domain yet, go and get one now in order to continue the setup.
How to get a domain? Simply you buy one! And it costs around 10$/year, so it's not that big deal!
We have a lot of DOMAIN REGISTRATION PROVIDERS where you can get a domain from, like:
Here in this course, we will be using Namecheap to get my domain, but you can use any other service if you want, all work in the same way, and if you need any help, we will be here 🙂.
Got a Domain? Great! ✔️ Let's continue.
2. VPS Server with Port 25 opened.
The second thing you will need is a VPS server, a public server to Install & Setup SMTP on.
What is a VPS server?
If you don't know what is a VPS server, simply it's a computer (a server) running in the cloud that you buy from a Web Hosting or Cloud Services company. And it's publicly accessible with a Public IP.
A VPS can be used to host your websites with higher performance and can be used to run a machine 24/7 in the cloud to do any task you want.
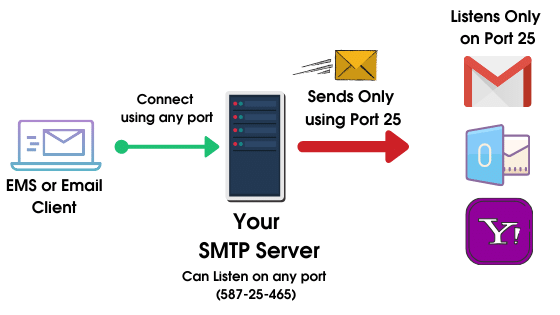
Port 25 open??
We mentioned that the VPS must have port 25 opened, what does this mean?
We don't want to bother your head dealing with technical stuff but, in short, any network service or software uses a certain port to communicate over the internet or network. For example:
- Connecting remotely to another Windows Machine using RDP software works over port 3389.
- SQL database systems like MYSQL on our computer works over port 3306.
- Connecting to a Linux machine remotely to manage it with SSH, uses port 22.
- When you surf the web and open websites, we use port 80. and so on.
By default, all servers and computers have a firewall running which blocks all ports except the ones you want. So, to use a certain service, we need to open that port in the firewall.
What you have to know also, that ports can be blocked and opened in two ways, incoming and outgoing, the following diagram will make things clearer:
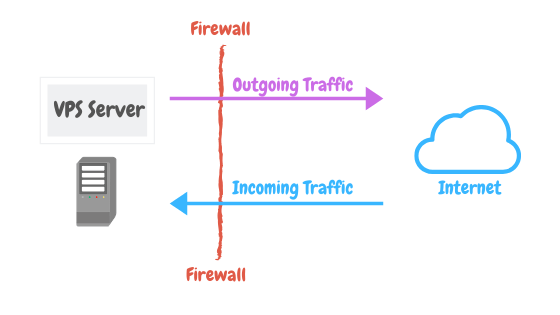
In our case, we are building an SMTP server, and the SMTP software or protocol communicates over port 25. So, we need to have port 25 opened.
When you get a VPS server, just make sure that the company allows Port 25 and don't block it, because some companies do this to protect from spammers.
Here is a list of some companies that allows port 25 by default:
- Contabo
- Interserver
- OVH
- DigitalOcean
- AWS (some accounts are blocked)
Are there any other Companies? Yes, you can contact the support of any company you want and ask if they block any ports by default. If not, then perfect, you can go with it.
Feel free to use any VPS company you want, It's up to you!
You can also sign up on DigitalOcean through this coupon link to get free $100 to test everything for free.
Or start with Contabo which we think is the cheapest VPS service that you can use, we have 2 servers configured with Contabo.
After you select your VPS company, just create a VPS Server with the following minimum specifications:
- Ubuntu 22.04 or 20.04 or 18.04 x64 as your operating system
- You can start with 1 CPU/2 GB RAM (And resize later).
Got your VPS? Great! ✔️ Let's continue.
VPS Server basic configuration
Now we have our new Ubuntu VPS server, let’s prepare it out for setup.
Connect to your server, using an SSH client like putty or bitvise. Or if you do not like to install these softwares and you are using Windows 10/11 or Linux or Mac OS then you can do the following:
- Press Win + R on your keyboard.
- Type cmd, and press Enter. A new window will open.
- In the window, type ssh username@ip-address (replace username with the username of your server and ip-address with the IP address of your server)
First, check your hostname:
hostname -fIf you don’t see a form of ANYTING.YOURDOMAIN.COM, then you need to change the hostname using the following command:
sudo hostname server.domain.comWhere the host is anything you want. Our domain for this tutorial is sapnaaz.com, so the command will look like this:
sudo hostname postal.sapnaaz.comMap your domain name
Now we have our VPS server and we set its name. Go to your Domain Provider and map your Domain to your VPS server. Just open DNS management zone and add a new A record like this:
Host: postal (Whatever you have chosen) Points To: YOUR_SERVER_IP
Done? ✔️ Let's continue.
The VPS is ready, and we can start the installation process. To setup SMTP Server on our VPS, we need to install an SMTP software.
Install Postal Mail Server on Ubuntu 22.04/20.04/18.04
The installation of Postal Mail Server on Ubuntu is not as complicated as others say. By sparing some minutes and following below few steps, you should have Postal Mail Server running on Ubuntu 22.04/20.04/18.04 server.
Step 1: Update your system
Like all other installations, we start the installation by ensuring our system is updated.
sudo apt update
sudo apt -y upgrade
Perform a reboot if it is required:
[ -f /var/run/reboot-required ] && sudo reboot -fThen install git once the system is up
sudo apt -y install git curl jqStep 2: Install Docker & Docker Compose
Import Docker repository GPG key:
curl -fsSL https://download.docker.com/linux/ubuntu/gpg | sudo gpg --dearmor -o /etc/apt/trusted.gpg.d/docker-archive-keyring.gpgWith GPG key imported you can add Docker repository to your Ubuntu system.
sudo add-apt-repository "deb [arch=amd64] https://download.docker.com/linux/ubuntu $(lsb_release -cs) stable"Finally install Docker CE on Ubuntu 22.04/20.04/18.04:
sudo apt update
sudo apt install docker-ce docker-ce-cli containerd.io
Add your user account to docker group.
sudo usermod -aG docker $USER
newgrp docker
Confirm successful installation by checking Docker version
$ docker version
Client: Docker Engine - Community
 Version:           20.10.16
 API version:       1.41
 Go version:        go1.17.10
 Git commit:        aa7e414
 Built:             Thu May 12 09:18:18 2022
 OS/Arch:           linux/amd64
 Context:           default
 Experimental:      true

Server: Docker Engine - Community
 Engine:
  Version:          20.10.16
  API version:      1.41 (minimum version 1.12)
  Go version:       go1.17.10
  Git commit:       f756502
  Built:            Thu May 12 09:16:22 2022
  OS/Arch:          linux/amd64
  Experimental:     false
 containerd:
  Version:          1.6.4
  GitCommit:        212e8b6fa2f44b9c21b2798135fc6fb7c53efc16
 runc:
  Version:          1.1.1
  GitCommit:        v1.1.1-0-g52de29d
 docker-init:
  Version:          0.19.0
  GitCommit:        de40ad0
Download the latest Compose
curl -s https://api.github.com/repos/docker/compose/releases/latest | grep browser_download_url | grep docker-compose-linux-x86_64 | cut -d '"' -f 4 | wget -qi -Make the binary file executable.
chmod +x docker-compose-linux-x86_64Move the file to your PATH.
sudo mv docker-compose-linux-x86_64 /usr/local/bin/docker-composeConfirm version.
$ docker-compose version
Docker Compose version v2.6.1
Step 3: Install MySQL / MariaDB database server
The other requirement of Postal Mail server is a database server.
Now, you can install MariaDB in the docker container.
docker run -d \
   --name postal-mariadb \
   -p 127.0.0.1:3306:3306 \
   --restart always \
   -e MARIADB_DATABASE=postal \
   -e MARIADB_ROOT_PASSWORD=postalpassword \
   mariadb
Step 4: Install and Configure RabbitMQ
Postal uses RabbitMQ for queueing. RabbitMQ is necessary to process messages and distribute the loads
To install it, run the following commands
docker run -d \
   --name postal-rabbitmq \
   -p 127.0.0.1:5672:5672 \
   --restart always \
   -e RABBITMQ_DEFAULT_USER=postal \
   -e RABBITMQ_DEFAULT_PASS=password \
   -e RABBITMQ_DEFAULT_VHOST=postalvhost \
   rabbitmq:3.8
Now we have installed all the prerequisite packages, it’s time to install Postal
Step 5: Install and Configure Postal on Ubuntu 22.04/20.04/18.04
Cloning the Postal repository
sudo git clone https://postalserver.io/start/install /opt/postal/installCreate a symlink for Postal binary
sudo ln -s /opt/postal/install/bin/postal /usr/bin/postalDNS Records
A Records
You’ll need these records for accessing the API, management interface & SMTP server.
| Hostname | Type | Value |
|---|---|---|
| postal.yourdomain.com | A | Your_Server_IP |
SPF Record
You can configure a global SPF record for your mail server which means domains don’t need to each individually reference your server IPs. This allows you to make changes in the future.
| Hostname | Type | Value |
|---|---|---|
| spf.postal.yourdomain.com | TXT | v=spf1 ip4:Your_Server_IP ~all |
Route domain
If you wish to receive an incoming e-mail by forwarding messages directly to routes in Postal, you’ll need to configure a domain for this just to point to your server using an MX record.
| Hostname | Type | Value |
|---|---|---|
| routes.postal.yourdomain.com | MX | 10 postal.yourdomain.com |
Return Path
The return path domain is the default domain that is used as the MAIL FROM for all messages sent through a mail server. You should add DNS records as below.
| Hostname | Type | Value |
|---|---|---|
| rp.postal.yourdomain.com | A | Your_Server_IP |
| rp.postal.yourdomain.com | TXT | v=spf1 a mx include:spf.rp.postal.yourdomain.com ~all |
Run the command below and replace postal.yourdomain.com with the actual hostname you want to access your Postal web interface at.
$ sudo postal bootstrap postal.example.com
Latest version is: 2.1.1
=> Creating /opt/postal/config/postal.yml
=> Creating /opt/postal/config/Caddyfile
=> Creating signing private key
This will generate three files in /opt/postal/config.
- postal.yml is the main postal configuration file
- signing.key is the private key used to sign various things in Postal
- Caddyfile is the configuration for the Caddy webserver
Open Postal configuration file.
sudo vim /opt/postal/config/postal.ymlAt the minimum, have the following settings:
web:
  # The host that the management interface will be available on
  host: postal.yourdomain.com
  # The protocol that requests to the management interface should happen on
  protocol: https

main_db:
  # Specify the connection details for your MySQL database
  host: localhost
  username: root
  password: postalpassword
  database: postal

message_db:
  # Specify the connection details for your MySQL server that will be house the
  # message databases for mail servers.
  host: localhost
  username: root
  password: postalpassword
  prefix: postal

rabbitmq:
  # Specify the connection details for your RabbitMQ server.
  host: 127.0.0.1
  username: postal
  password: password
  vhost: postalvhost

dns:
  # Specifies the DNS record that you have configured. Refer to the documentation at
  # https://github.com/atech/postal/wiki/Domains-&-DNS-Configuration for further
  # information about these.
  mx_records:
    - mx.postal.yourdomain.com
  smtp_server_hostname: postal.yourdomain.com
  spf_include: spf.postal.yourdomain.com
  return_path: rp.postal.yourdomain.com
  route_domain: routes.postal.yourdomain.com
  track_domain: track.postal.yourdomain.com

smtp:
  # Specify an SMTP server that can be used to send messages from the Postal management
  # system to users. You can configure this to use a Postal mail server once the
  # your installation has been set up.
  host: 127.0.0.1
  port: 2525
  username: # Complete when Postal is running and you can
  password: # generate the credentials within the interface.
  from_name: Postal
  from_address: [email protected]
Edit the file to fit your Postal settings.
When done Initialize database by adding all the appropriate table:
$ sudo postal initialize
[+] Running 5/5
 ⠿ smtp Pulled                                                              0.5s
 ⠿ cron Pulled                                                              0.5s
 ⠿ requeuer Pulled                                                          0.5s
 ⠿ worker Pulled                                                            0.5s
 ⠿ web Pulled                                                               0.5s
Initializing database
......
Create your initial admin user
Add your Email, Name & Suitable Password (Remember this email and password as this will be required to login to postal)
$ sudo postal make-user
Postal User Creator
Enter the information required to create a new Postal user.
This tool is usually only used to create your initial admin user.

E-Mail Address      : [email protected]
First Name          : Admin
Last Name           : User
Initial Password:   : ********

User has been created with e-mail address [email protected]
Starting the application
Run the following command to start the Postal application
$ sudo postal start
[+] Running 5/5
 ⠿ Container postal-cron-1      Started                                     0.4s
 ⠿ Container postal-web-1       Started                                     0.2s
 ⠿ Container postal-requeuer-1  Started                                     0.3s
 ⠿ Container postal-smtp-1      Started                                     0.3s
 ⠿ Container postal-worker-1    Started                                     0.3s
This will run a number of containers on your machine.
You can look at the status at any time using:
$ sudo postal status
NAME                COMMAND                  SERVICE             STATUS              PORTS
postal-cron-1       "/docker-entrypoint.…"   cron                running
postal-requeuer-1   "/docker-entrypoint.…"   requeuer            running
postal-smtp-1       "/docker-entrypoint.…"   smtp                running
postal-web-1        "/docker-entrypoint.…"   web                 running
postal-worker-1     "/docker-entrypoint.…"   worker              running
Step 6: Configuring Caddy Web Server
A web proxy is required for all web traffic and SSL termination. There are many options for Proxy – Nginx, Apache, HAProxy, e.t.c. In this guide, we’re going to use Caddy.
We can run Caddy web server using Docker:
docker run -d \
   --name postal-caddy \
   --restart always \
   --network host \
   -v /opt/postal/config/Caddyfile:/etc/caddy/Caddyfile \
   -v /opt/postal/caddy-data:/data \
   caddy
Check it’s running:
$ docker ps
CONTAINER ID   IMAGE                               COMMAND                  CREATED              STATUS              PORTS     NAMES
67461a34ae39   caddy                               "caddy run --config …"   20 seconds ago       Up 20 seconds                 postal-caddy
1bc1bac79c15   ghcr.io/postalserver/postal:2.1.1   "/docker-entrypoint.…"   About a minute ago   Up About a minute             postal-smtp-1
c5a04cea4211   ghcr.io/postalserver/postal:2.1.1   "/docker-entrypoint.…"   About a minute ago   Up About a minute             postal-worker-1
e188ee4c2844   ghcr.io/postalserver/postal:2.1.1   "/docker-entrypoint.…"   About a minute ago   Up About a minute             postal-requeuer-1
d7335cd48fa1   ghcr.io/postalserver/postal:2.1.1   "/docker-entrypoint.…"   About a minute ago   Up About a minute             postal-web-1
c4b1cc7a852e   ghcr.io/postalserver/postal:2.1.1   "/docker-entrypoint.…"   About a minute ago   Up About a minute             postal-cron-1
Once this has started, Caddy will issue an SSL certificate for your domain and you’ll be able to immediately access the Postal web interface and login with the user you created in one of the previous steps.
Upgrading Postal
Once you have installed Postal, you can upgrade to the latest release it by running this command:
$ sudo postal upgrade
warning: redirecting to https://github.com/postalserver/install/
From https://postalserver.io/start/install
 * branch            main       -> FETCH_HEAD
Already up to date.
No version specified, using latest available version...
Upgrading to 2.1.1
[+] Running 5/5
 ⠿ worker Pulled                                                          1.5s
 ⠿ cron Pulled                                                            0.5s
 ⠿ web Pulled                                                             0.4s
 ⠿ smtp Pulled                                                            0.5s
 ⠿ requeuer Pulled                                                        0.5s
Migrating database
[+] Running 5/0
 ⠿ Container postal-worker-1    Running                                   0.0s
 ⠿ Container postal-web-1       Running                                   0.0s
 ⠿ Container postal-smtp-1      Running                                   0.0s
 ⠿ Container postal-requeuer-1  Running                                   0.0s
 ⠿ Container postal-cron-1      Running                                   0.0s
Step 7: Access Postal Admin Web Dashboard
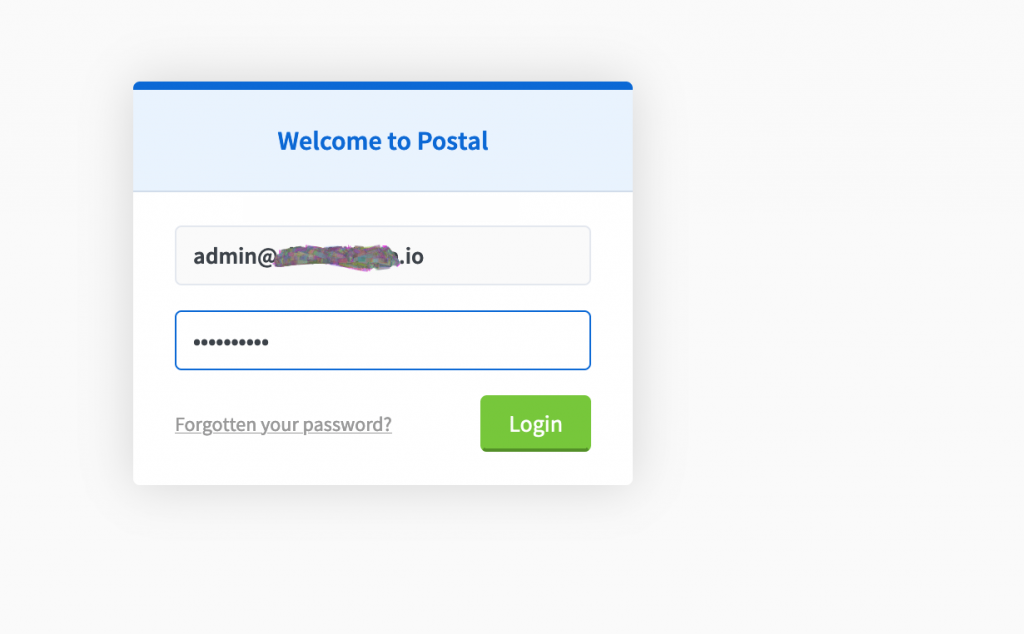
Access Postal Administration page on https://postal.yourdomain.com
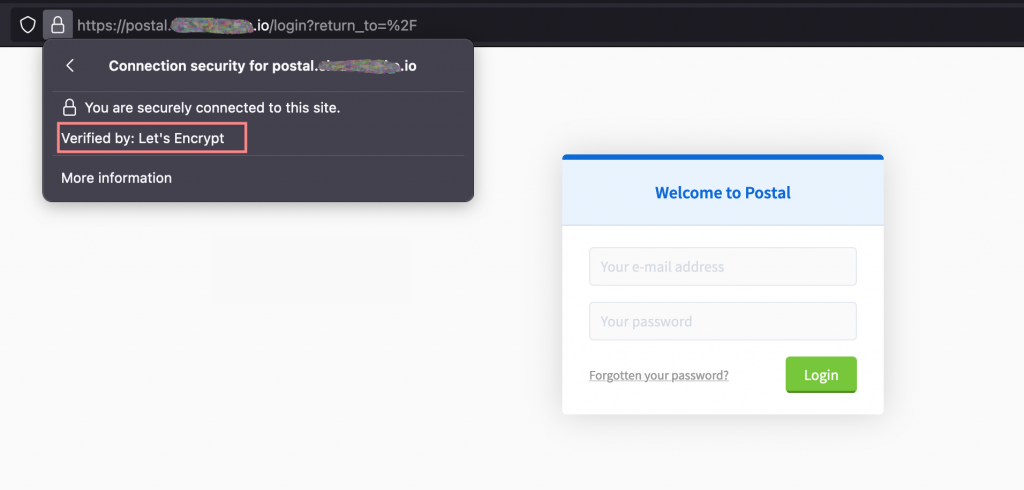
You should see Let’s Encrypt SSL certificate in place if your installation was successful and login with admin user email created earlier.
You’ll get a dashboard which looks like this:
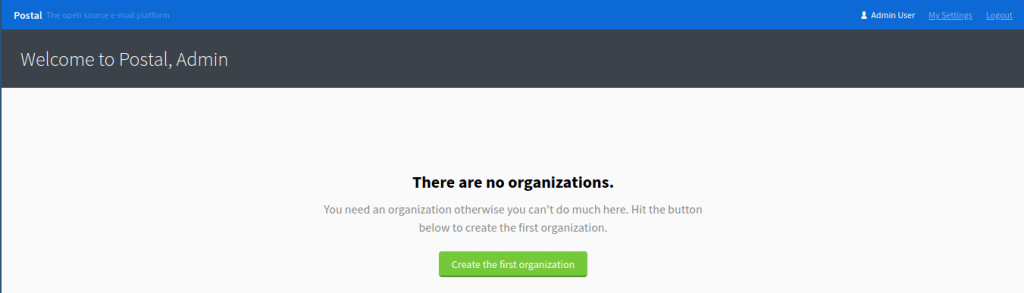
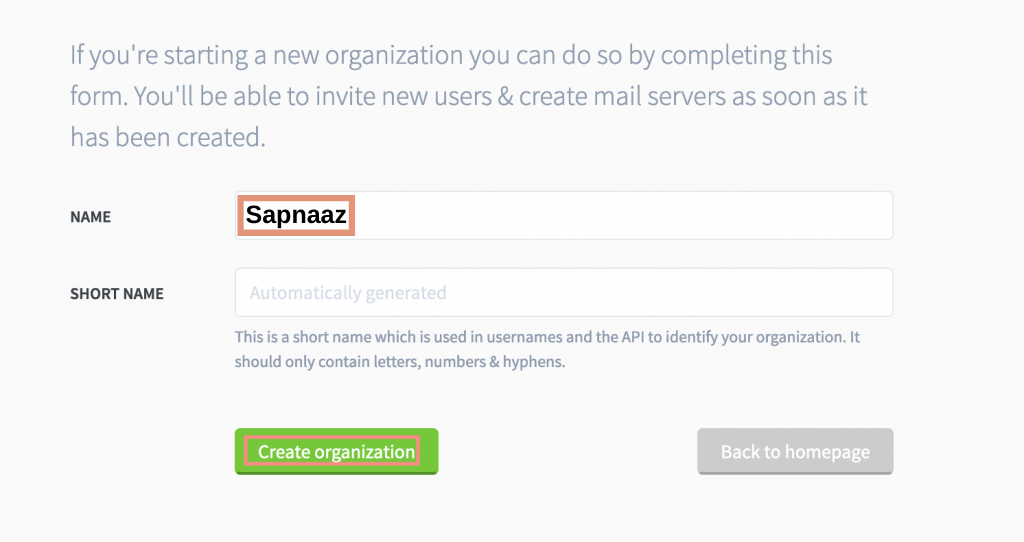
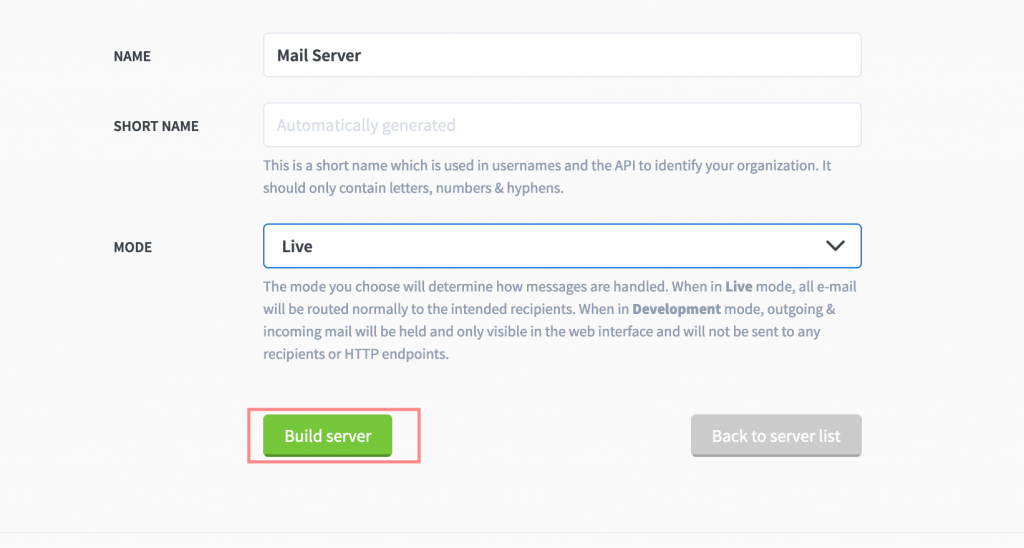
Create your first organization
Provision mail server to start sending and receiving messages using Postal.
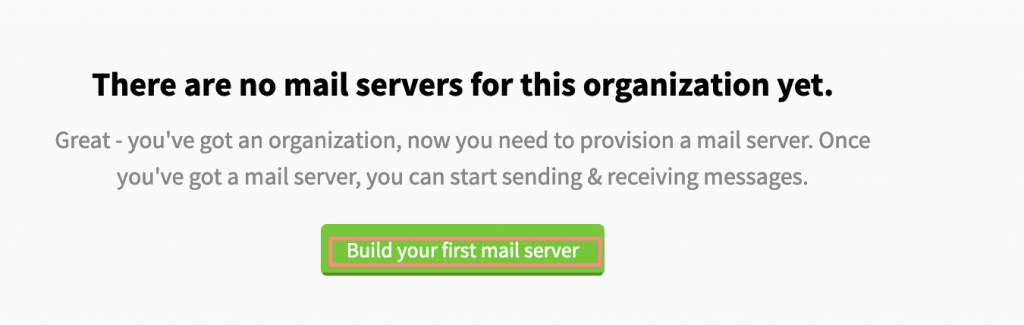
Give your mail server a name and choose live mode.
With the basic configurations required you can now use Postal email delivery software solution.

Refer to the Postal Administration guide for further configurations.
Congratulations! You have completed setting up your own Free SMTP Server using Postal. But before you start sending emails, you have to understand some crucial concepts and follow up on the guidelines to get the best delivery rates and reach the inbox!
- Warming Up your SMTP server – We will be updating a blog about this very soon.
- rDNS (Reverse DNS)
- DMARC (Domain-based Message Authentication, Reporting & Conformance)
- MX Record
- Avoid Spam Factors – IP Reputation, SPF, DKIM, DMARC, Message Body, Email List health.
If you are having difficulties in setting up the SMTP server, you can order our service for creating it here or you can ask your questions in the comments below or in the forum.
